Wednesday, December 28, 2011

Christmas Menu 2011

Do you ever look at your family tree and wonder what Christmas used to be like before your great, great, great grandparents came to America?

My family came from Sweden and Norway, they settled in Northern Minnesota in the early 1900s. There is very little about the Christmas of my childhood that resembles what they would have had in the old country. Only lefse. I love lefse!

I decided that this year I would try to bring some of my background into our Christmas and I was very pleased with how everything turned out!  Recipes will be posted tomorrow.


Scandinavian Christmas Eve
  • Gravlax on Rye Crisp Crackers with cream cheese, red onions and capers
  • Gravlax on roasted potato rounds with capers
  • Cucumber Salad
  • Lefse
  • Rise Pudding
  • Mulled Wine

rise pudding
Brie with Cherry Preserves and Walnuts
Christmas Day
  • Brie with Cherry Preserves and Walnuts
  • Spiral Sliced Ham
  • Scalloped Potatoes
  • Waldorf Salad
  • Bavarian Cream Torte from Rheinlanders Bakery

Thursday, December 22, 2011

Cinnamon Rolls: Friends for Life

If you got a pan of these Cinnamon Rolls from me today....then you know how I feel about you.


I think this will be our new Christmas Tradition.  But next year I'll make them at my brother in laws house because my galley kitchen was much too small!

Tuesday, December 20, 2011

Cinnamon Roll Waffles

If you want to see your kid with this look on their face.


You have to make these.


They only need to cook for a minute and a half.  Fast, easy and delicious!

Monday, December 5, 2011

Hot Chocolate Balls

It's time for another Pintervention Party post with Steph and Nicole! I've been looking high and low for things to put in the goodie bag for my son's Kindergarten Winter Party in two weeks.

I knew that I wanted to include my homemade marshmallows but I didn't know if I wanted to just put a stick in them with some frosting or......what.


Then....pinned Hot Chocolate Balls!
source 

These Hot Chocolate Balls will be the perfect addition to the goodie bags with a chunk of marshmallow!

Truffle Hot Chocolate Balls
from melskitchencafe.com
*Makes about 10 hot chocolate balls
 
12 ounces semisweet chocolate chips (about 2 cups)
1 cup heavy cream
1 tablespoon sugar
1/8 teaspoon salt

 
In a plastic bowl, combine all of the ingredients. Microwave for one minute intervals, stirring often, until the mixture is combined and very smooth and silky. Be extra careful not to overheat as the chocolate can seize. The trick is to stir often since the mixture will blend together even when it looks like the chocolate chips haven't melted completely.
 
Let the mixture cool for about 10 minutes at room temperature. Cover the bowl with plastic wrap and place in the refrigerator until the mixture is firm and scoopable, about 2-3 hours. Scoop out about 1/4-cup spoonfuls  (I used a cookie scoop) of the mixture and place them on a wax paper-lined baking sheet. My cookie scoop is about 1 1/2 tablespoons. Place the baking sheet in the refrigerator and let the mounds harden slightly, about 15-20 minutes. Roll the chilled mounds into balls and place on squares of plastic wrap.  Pull the sides of the plastic wrap over to cover the ball and place the balls in the freezer until ready to use.
 
To make the hot chocolate: pour 1 cup milk into a microwave-safe mug. Carefully drop one unwrapped truffle hot chocolate ball in the milk. Microwave for about 2 minutes. Stir well until the chocolate is combined with the milk.
Serve warm!

Wednesday, November 30, 2011

K Cup Review: Barista Prima Italian Roast


I recently signed up for Green Mountains Cafe Express Coffee Club so that I never run out of K Cups again.  I found their prices to be comparable to the cups I buy at Target and I'm hoping this will save me money in the long run because I won't run to Target for a $12 box of coffee and then spend $100.

I know this happens to people other than me.  Target is a money suck!

I was really excited to see what all of the buzz was about with this new line of K Cups called Barista Prima.  They are a little bit more expensive than my old standby but I don't mind for paying more for a really great cup of coffee.  This will be my weekend coffee.  Because I deserve it.

The website describes the Italian Roast as robust, heavy-bodies and very dark.   The first thing that I noticed was that it is very smooth and even though I did add a little bit of half and half....it was really creamy.  It makes me want to sit in front of a fireplace with a book.   I'm telling you....it instantly gave me a homey feeling.

Coffee should make you feel good.  I believe this is THE perfect cup of coffee.

**disclosure: Green Mountain and Barista Prima didn't pay me for this review.  I just love coffee and sharing my finds with my friends and readers.

Monday, November 21, 2011

Pintervention: Chai Tea Concentrate

I'm joining the Pintervention Party with Stephanie and Nicole because I think I have a problem. A Pinning Problem!


BEAN/MCCALLS


I have tried several things on Pinterest, a couple recipes and a scarf.  The scarf didn't turn out well.  It always surprises me when I'm craft challenged because I'm normally pretty crafty!

Last week....I had a sick little boy at home and in between cuddling him and checking on him while he slept, I spent time on pinterest.  I must have pinned 500 things!

I saw the pin for Homemade Chai Tea and I thought to myself....SELF, I could really go for some CHAI right now!

I checked out the recipe and remembered that I'm a Martha Stewart Wannabe and realized that I had all of the ingredients.  Yes, I had cardamon pods and star anise.  I'm a foodie!  I save jelly jars and they were the perfect containers because then they are easy to share with friends.


Homemade Chai Concentrate from Tasty Yummies
makes approximately 4 cups

4 1/2 cups water
8 bags black tea – I used orange pekoe
2 cinnamon sticks
1 vanilla bean, split in half (or 1 tablespoon of vanilla extract added at the very end)
1/2 cup raw cane sugar (you can add more or less depending on how sweet you like your chai)
1 – 3-inch section of fresh ginger, cut into pieces
10 whole cloves
8 cardamom pods
1/2 teaspoon freshly ground nutmeg
2 whole star anise pods
1/2 teaspoon of whole black peppercorns
1 teaspoon orange zest
1 tablespoon raw honey
1 small square section of cheesecloth, approximately 6″ square (if you don’t want to mess with cheesecloth, make sure you have a good strainer you can use at the end)
kitchen twine

Remove the tags from the teabags and tie them all together. Prepare the spices, vanilla bean and orange zest by laying them in your cheesecloth, Leave the cinnamon sticks out to make the little pouch of spices a bit more compact. Tie the cheesecloth pouch shut with a small piece of kitchen twine. If you leave the cinnamon sticks out, just tie them together with kitchen twine.

Add the water and sugar to a medium sized saucepan and bring to a boil over a medium-high heat. Once boiling, reduce the heat to a simmer and put in the tea bags, cheesecloth pouch and cinnamon sticks. Simmer for 20 minutes.

Remove the pan from the heat strain the concentrate through a sieve.  At this point if you want a bit more sweetness you can add a tablespoon of honey, stir to dissolve. I don’t always do this, but it is a really nice touch. Additionally, if you didn’t use a whole vanilla bean, add your vanilla extract now. Stir to combine.

Allow the mixture to cool before pouring it into an airtight jar or container. This amount fits perfectly into a 1-quart mason jar. Store in the refrigerator for up to one week.

** To serve, mix 1 part concentrate with 1 part milk of your choice. Heat for a warm beverage or serve over ice for a cold drink.


Are you addicted to Pinterest?  Have you made something and want to share it?  Join the party!

Monday, November 7, 2011

Match Made In Heaven

I think these two wines should get married.


In other news....my husband kicked me out of the kitchen yesterday and made this. I don't have a recipe and it doesn't have a name....but it was amazing!

Thursday, November 3, 2011

Tuesday, November 1, 2011

Homemade Marshmallows

Hey Everyone....and Shawn and Impulsive Addict.


You all really know me as Connie from The Young and The Relentless but today....I'm going to show another side of myself. My Martha Stewart inspired self. Except that bitch sometimes steers me a stray.

Several years ago, I tried her recipe for Marshmallows and it was a huge flop! I rarely have disasters in the kitchen but that was a huge one and it banged up my ego.

Two years ago, I was supposed to drive to the wilds of Utah to learn to make Marshmallows. I was so excited because I was going to be able to right a wrong.

Then if snowed. A LOT!

I was unable to attend Marshmallow Making 101 with Prairie Mama (also known as Kim).

So last week, I find myself in a meeting to plan my son's Kindergarten Winter Party and all of a sudden, my mouth is telling them that I will make homemade Marshmallows. My hand tried to cover my mouth but it was too late.

I raced home from this meeting and started searching for Kim's recipe and decided to make a test batch on Sunday to make sure that I could make them and not a fool of myself.

I think they turned out pretty great!


Homemade EASY Marshmallows
adapted from Brownie Points Blog

4 envelopes of gelatin
3/4 cup water
1 tablespoon Vanilla
3 cups sugar
3/4 cup water
1 1/4 corn syrup
1/2 tsp salt
Confectioners Sugar

Line a 9X13 pan with parchment paper (or wax paper).  Spray the paper with non-stick spray.

For the recipe you MUST have a stand mixer and a whisk attachment.  In the mixing bowl, combine the water (3/4 cup) with the vanilla  and then sprinkle the gelatin over...do not dump the gelatin in.

Heat a saucepan over medium high heat and add the sugar, salt, corn syrup and other 3/4 cup of water.  Bring to a boil with the lid on and without stirring it.  When the mixture is boiling, remove the lid and stick your candy thermometer on the pan and cook until it reaches the soft ball stage, 234-240 F.

With the mixer at medium speed, pour all of the syrup slowly into the mixing bowl.  The syrup is very hot so be careful!  When all of the syrup has been added....increase the speed to HIGH!  Warning: Your mixer will sound like it's about to take off and you might think it's a bout to break. 

Whip this mixture until it is very fluffy and stiff.  This will take 8-10 minutes and will go by quickly because you're worried that your mixer is about to launch itself out the window. Pour the marshmallow into the waiting pan and smooth with an oiled up offset spatula.  This mixture now has to sit, uncovered at room temperture, taunting your family for 10-12 hours.

When you are ready to cut your marshmallows, sprinkle a generous amount of confectioners sugar (also known as powdered sugar) over the marshmallows.  Turn the slab out onto a cutting board, peel off the paper and sprinkly more sugar. Slice with a pizza cutter or a meat cleaver.  The meat cleaver worked great for me!  You can also use cookie cutters to make fun shapes. After cutting, dip the pieces in sugar and then tap off the excess.

This make a TON of marshmallows and will keep  for several weeks in an airtight container.

Tips before making Marshmallows:

Make sure that your children are either entertained, or duct taped to the couch before starting this. You will not be able to leave the kitchen and if they start streaking around your home...you can't stop them.

Make sure you have used the restroom before starting this recipe because of the same reason above.

Realize that you will have powdered sugar everywhere.

Be prepared to threaten family members with their life if they touch your curing marshmallows before they are ready.

Wednesday, October 26, 2011

Chicken Tortilla Soup

I get really excited when the first snow falls in Colorado. It means boots, hats, gloves and SOUP! I love soup! This has to be one of my favorites and it's not kid friendly.

Chicken Tortilla Soup


1 pound, boneless chicken breasts, sliced into cutlets
1.5 tablespoons olive oil, separated
1/2 teaspoon salt
1 tablespoon chili powder (more to taste)
1 large onion, diced
1 green bell pepper, diced
1 red bell pepper, diced
2 cloves of garlic, sliced thin
32 oz chicken broth
2 cups of water
2 (10oz) cans of Rotel with Green Chilies
3 cans black beans, drained
1/2 teaspoon cumin
1/2 teaspoon cayenne pepper
Salt to taste
Corn Tortilla strips

Garnish:
1 lime, cut into wedges
Avocado, diced
Colby Jack Cheese, shredded

Heat 1 1/2 teaspoons of oil in a soup pot over medium-high heat.  Season chicken with salt and chili powder.  Add chicken to the pot and cook, turning only once, until brown on both sides and cooked through.  Transfer to a cutting board.  When cool enough to handle, cut into chunks or shred.

Heat a tablespoon of oil in the now empty pot and add onion, green and red peppers and garlic. Saute for 5 minutes or until soft and fragrant. Add chicken broth, water, tomatoes,  black beans and chicken.  Bring to a boil then reduce the heat to medium low. Add cumin and cayenne, salt to taste. Simmer for at least 20 minutes to meld the flavors.  I like to simmer for a couple of hours.

Turn off heat 15 minutes before serving and add tortilla strips.   Garnish with cheese,  avocado and lime wedge.

Tuesday, October 11, 2011

Caffeine Crawl

I need to go to the Caffeine Crawl.  


It's in my DNA! (that's how much I drink)

photo credit
Who wants to go with me?

Friday, October 7, 2011

The One Where I Cry Over Popcorn

I went to Whole Foods this morning for my new addiction.


This amazing Caramel Corn from Rocky Mountain Popcorn is my new favorite thing!  It's gluten-free and just so tasty.  

I was disappointed to see that Whole Foods (the one in Belmar) didn't  have it and there wasn't a tag for it either.  I almost cried!  

How can you get me hooked on this little bag of heaven and then not have it anymore?  

I decided to try a few other things instead.  Reluctantly.


I just ate a couple small bowlfuls of 365 Kettle Corn and just realized that it's NOT gluten-free.  CRAP!  Well....it tastes good anyway.


Wednesday, October 5, 2011

The Way To His Heart....

Italian Sausage!!


My marriage tip for the day.

Instead of sending your husband racy pictures of yourself while he's at work....

Send him pictures of the Italian Sausage Store!

This also guarantees that he'll make it home on time for dinner.

Tuesday, September 20, 2011

Connie's Meat Sauce

I really can't stand sauce in a jar.   It just doesn't taste right....but it's easy and convenient.  I recently decided that I don't like eating food that tastes bad.  So I decided to start making my own sauce.

We tried on this on julienned zucchini and spaghetti squash and we decided that we love the zucchini which works great because it doesn't need to be cooked!


Connie's Meat Sauce

1 pound lean ground beef
1 pound pork sausage
3 cloves garlic, minced
1 onion, chopped
1 28 oz can diced tomatoes
1 (6 ounce) cans tomato paste
3 bay leaves
1 tablespoon dried thyme
1 1/2 tablespoons dried oregano
1 1/2 teaspoons dried basil
1 teaspoon ground black pepper
1 tablespoon white sugar
2 cups of water

In a large stockpot cook the ground beef, sausage, garlic, onion. Cook until beef is no longer pink. Drain into a large colander to drain grease.

To the large sauce pot add tomatoes, tomato paste, bay leaves, oregano, basil, black pepper, sugar and stir well. Pour the meat mixture into the pot. Bring to a boil, adding water as needed. Reduce heat and cover. Simmer for 2 hours. Season with salt to your taste.

Thursday, September 1, 2011

New Favorite Tool


I bought this 3 in 1 Peeler at Sur La Table a couple weeks ago and it's become my new favorite gadget in my Paleo kitchen.

My husband is a big fan of ribbons of Zucchini but he said he might like them more if they were julienned.  I knew there had to be a tool for that.

Tomorrow's recipe: Meat Sauce with julienne zucchini instead of pasta!

Tuesday, August 23, 2011

Verde Shrimp Taco or Salad

I love Shrimp Tacos! What am I saying....I love tacos! I decided to make one of my favorite dishes....but paleo it up. Yes. Paleo is a verb.

If I wasn't trying to be strict....I would go ahead and eat the corn tortilla but instead my serving will have a bed of chopped lettuce under it.


Shrimp

2 lb bag frozen shrimp
1/2 can Salsa Verde
1 tbsp cayenne
1 tsp cumin
1/2 tsp salt

Thaw the shrimp, remove shells and tail and throw into a bowl.  Stir in  Salsa Verde and let sit for 30 minutes.  Add spices and stir.  Heat a deep skillet to medium heat and add 1 tbsp coconut oil.  Add Shrimp and cook, stirring around until the shrimp is pink and done.

Mango Salsa

1 ripe mange, peeled, chopped into small pieces.
1 orange bell pepper, chopped
1 jalapeno, diced (keep seeds if you like it hot)
1 small red onion, diced
The juice of one lime
3 tbsp cilantro, chopped
Salt to taste


Peel and chopped the mango, chop the orange bell pepper, dice the jalapeno and red onion. Place all of the ingredients into a bowl with a lid.  Cut your lime in half and squeeze the juice in. Try to resist having a shot of tequila.  Add salt and cilantro.  Stir.  Cover and refrigerate for at least an hour.

Assemble your shrimp on a corn tortilla or a bed of chopped lettuce (if you're paleo) and add Mango Salsa and slices of avocado. 

This dish is very delicious and satisfying!


Thursday, August 18, 2011

Dining Out Paleo

We got out to eat most every weekend.  I enjoy the break from our hot little galley kitchen and eating food I don't normally eat at home.

This has changed mostly.  I'm trying to be very careful what I order but sometimes I don't notice that cheese comes on the food. Oops!  I need to be more careful when reading the menu.

Fajitas

We like Mexican food so my go to item is chicken fajitas and extra guacamole!

Burger with a side of guacamole
Order a burger without the bun and will a size of veggies, mushrooms or avocado.See...I forgot to ask for no fries!  This was a grass-fed burger from The Dillon Dam Brewery in Dillon Colorado. It was the best meat I've ever tasted!

Chicken Tikka Tandoori

This! Was my favorite meal so far. Chicken Tikka Tandoori from Little India in Belmar.

McDonald's Sausage & Eggs

My family wanted McDonald's one Saturday morning so I ordered the big breakfast and then gave the biscuit and potato cake to my husband.

I've turned eating out with my family into a challenge! 

Thursday, August 11, 2011

Beef Curry

Two things that I love about the Paleo Diet.....Curry and Coconut Milk.

I have mixed these items together several times with great success. My husband really liked this and I can see it being a regular part of our meal plan.  Make a lot.  It makes great leftovers.


Beef Curry

1.5 pounds of ground beef (grass-fed if you're so inclined)
2 tablespoons Curry Powder
1/2 teaspoon Cayenne Pepper
1/2 cup coconut milk


Brown your hamburger and drain off the grease if these is any. Add the spices, coconut milk and simmer for 15 minutes. Serve with a vegetable. I like sliced zucchini or microwaved sweet potato.


Linking up this dish with Primal Toad. I'm super excited to find other great recipes since I'm still a newbie!

Friday, August 5, 2011

Rock N Meat

A couple weeks ago, my son desperately wanted a Sorcerer's Stone so I googled ROCK STORE and found a cute little place a few blocks away called Red & Green Minerals.  It had every rock under the sun and other cool things too.  We were headed back to the car when something caught my eye.


An Italian Meat Market!


 We walked into the small space and were amazed at all of the stuff they have.  It was at this moment that I was regretting my gluten free lifestyle and wishing I could take some pasta home.


We stepped up to the deli counter and tried a few things.  I was really excited to find Prosciutto and they gave us some sausage to cook at home.  So nice of them!  It was delicious by the way! 

We love finding little hidden gems like this and I was super excited to share it with my Denver readers.

They have two locations.  One in Lakewood and one in Aurora. 

Carmine Lonardo's Meat Market and Deli
7585 W. Florida Ave
Lakewood, CO 80232
303.9985.3555


I'm doing great on the Paleo Diet and wanted to share one of my favorite snacks so far.


Prosciutto and Cantaloupe

Sweet and Salty!

Love!

Thursday, July 21, 2011

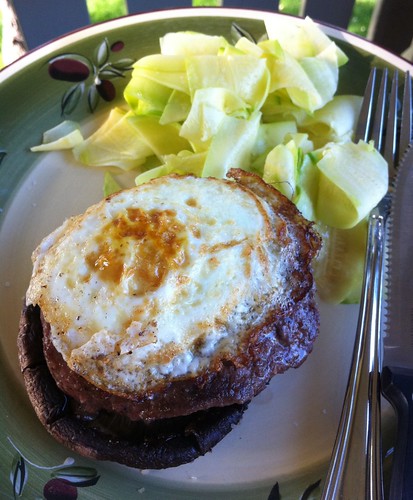
Portobello Burgers with Egg

So far the two dinners that I've made have been loved by my husband! I might be able to convert him afterall! YAY!

I saw this on a blog when I was researching Paleo recipes and I thought it sounded delicious. It really is.

It also only took about 20 minutes to make.

Burger and Egg on Portabello

Portobello Burger with Egg

serves 2

2 Portobello Mushroom Caps
2 Hamburger Patties
2 eggs
Salt and Pepper to taste

Brush coconut oil on the mushroom caps and broil in the oven for 7 minutes on each side. Prepare hamburger patties. Grill them, fry them or throw them in the oven too. Fry the eggs...just the way you like them. I like mine with a little bit of runny yolk. Stack them up and serve them with a cup of sliced zucchini. I used the vegetable peeler and they turned out great!

Wednesday, July 20, 2011

Avocado and White Bean Wrap

I've officially run out of no cook dinner recipes. And now I'm onto a new diet that I'll be focusing on and suffering through the heat to cook them.

I'm going Paleo. So...coming up will be a bunch of Paleo friendly recipes and restaurants. I'm pretty excited about it and really hope that it works for me.

Back to the wrap. This was awesome. Hubby loved it and said it was even better the next day in his lunch. It's a little spicy and super tasty.


 Avocado & White Bean Wrap
adapted from Eating well

2 tablespoons cider vinegar
1 tablespoon canola oil
2 teaspoons finely chopped canned chipotle chile in adobo sauce
1/4 teaspoon salt
2 cups shredded red cabbage
1/4 cup chopped fresh cilantro
1 15-ounce can white beans, rinsed
1 ripe avocado
1/2 cup shredded sharp Cheddar or Monterrey Jack cheese
2 tablespoons minced red onion
4 8- to 10-inch whole-wheat wraps, or tortillas

Whisk vinegar, oil, chipotle chile and salt in a medium bowl. Add cabbage, carrot and cilantro; toss to combine.

Mash the beans and avocado in another medium bowl with a potato masher or fork. Stir in the cheese and onion.

To assemble the wraps, spread about 1/2 cup of the bean-avocado mixture onto a wrap (or tortilla) and top with about 2/3 cup of the cabbage-carrot slaw. Roll up. Repeat with remaining ingredients. Cut the wraps in half to serve, if desired.

Edited to Add:

I bunched the ingredients into the recipe thingy on My Fitness Pal and here is what the results are:

click to make bigger

Monday, July 11, 2011

Watermelon Gazpacho

In my quest to find No Cook Dinner's....I've found several soup recipes.

I really enjoyed this one and I served it with half of a wrap made with turkey and Swiss cheese.

My husband didn't like the soup....his comment was that he felt like he was eating salsa. *Connie rolls her eyes*

He would prefer not to see this on our table again. Luckily, he's not in charge and I will be making it again. Soon.


Watermelon Gazpacho
Fitness magazine

8 cups  finely diced seedless watermelon
1   medium cucumber, peeled, seeded and finely diced
1/2   red bell pepper, finely diced
1/4 cup  chopped fresh basil
1/4 cup  chopped flat-leaf parsley
3 tablespoons  red-wine vinegar
2 tablespoons  minced shallot
2 tablespoons  extra-virgin olive oil
3/4 teaspoon  salt

Mix watermelon, cucumber, bell pepper, basil, parsley, vinegar, shallot, oil and salt in a large bowl. Puree 3 cups of the mixture at a time in a food processor to the desired smoothness; transfer to another large bowl. Puree another 3 cups and add to the bowl. Puree the remaining diced mixture. Serve at room temperature or chilled.

Tuesday, July 5, 2011

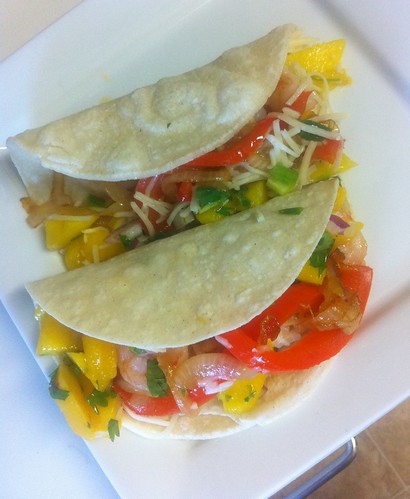
Shrimp Tacos with Mango Salsa

I'm on the look out for more no cook dinners! This one requires cooking but not very much. I love cooking with shrimp because it doesn't take much time at all.

Seafood Taco with Mango Salsa

For the Mango Salsa

2 mangoes, peeled and diced
1 jalapeno, stemmed and diced (leave seeds if you want it spicy)
1/2 medium red onion, diced
1 tbsp lime juice
1/2 tsp salt
3 tbsp cilantro, chopped

For the Taco

1 lb of shrimp, peeled and deveined
1 tsp salt
3 tbsp olive oil
1 medium yellow onion, sliced
Dash of Worcestershire
Dash of Tabasco
1 red bell pepper, sliced
8 corn tortillas
2 cups shredded Monterrey jack cheese

Combine all of the ingredients for the mango salsa in a bowl and stir. Cover and refrigerate for a few hours.

Take the shells off of the shrimp and sprinkle salt on top. In a large pan over medium heat, saute the shrimp in 1 tbsp of olive for about 3 minutes, until they are pink. Transfer the shrimp to a plate and add the remaining 2 tbsps of olive oil to the pan. Add the onions, Worcestershire and Tabasco and cook until softened, about 5 minutes. Add the red bell pepper and cook for 5 more minutes. Remove from heat and salt and pepper to taste.

Assemble you tacos with shrimp, onion and pepper mixture, cheese and salsa. Or make them into quesadillas.

If you are the low-carb type...this taste great without the tortilla.

Friday, July 1, 2011

Tropical Chicken Wrap

I live in an apartment that has one of the AC units in the wall.  It cools a 8 foot radius of the living room.  It's not even worth having the dang thing on...unless it's over 100 degrees and I'm stuck to the leather couch.

Cooking...has become ridiculous.  I really can't even boil water without heating the kitchen so much that I swear I'm going to pass out.

We've been ordering a lot of pizza and eating lot's of cereal.

I can't keep doing this....so I decided to come up with some no cook options!

The first one....a wrap! This one was loved by all and contained the contents of my pantry.  I have a crap load of oranges and nuts. I'm excited to see what else I can add to this once I actually go grocery shopping.


Tropical Chicken Wrap

2 cups of cooked chicken (i boiled mine), shredded
1 can of mandarin oranges, drained
1/4 cup cashews, chopped
1/4 teaspoon salt
pepper to taste
1/3 cup of mayonnaise
1 cup romaine lettuce, chopped
flour tortillas


Combine chicken, oranges, cashews, salt, pepper and mayonnaise in a bowl.  Warm tortillas and place handful of lettuce in the middle, add chicken and roll it up!

Serves 4

Thursday, June 30, 2011

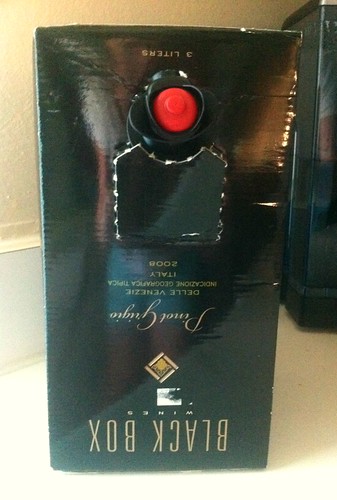
What To Do When Your Box of Wine Springs A Leak

Monday morning I woke up to find a puddle of Pinot Grigio in my refrigerator. My first thought was....what would Ramona do?


I decided that Ramona would drink that box of wine as fast as she could so that none of it would go to waste.

Then I remembered that it was 8am.

I thought about it for a few minutes as my fridge continued to fill with wine and I had my A-Ha moment!

Leaky Box of Wine

I turned that frown wine upside down!

Friday, June 24, 2011

Grand Marnier Zabaglione

We spent Father's Day at my brother in law's house eating our weight in deep fried and grilled fresh fish from his recent fishing trip to Alaska.

I made a couple dishes to go with it that I was not happy with. I'm planning to rework the recipes before sharing them because I think they have the potential to be great!

For dessert...I wanted something light and creamy. This fit the bill and was super simple and fast.

By the way...if you're wondering, Grand Marnier does come in a small bottle. It's not cheap so I'm going to looking for more ways to use it.


Grand Marnier Zabaglione

Grand Marnier Zabaglione
 adapted from Epicurious and Bon Appetit Magazine June 2009

Serves 4

Strawberries, Raspberries or Blueberries
6 large egg yolks
6 tablespoons Grand Marnier or other orange liqueur
4 tablespoons water
3 tablespoons sugar
3 tablespoon sour cream
4 fresh mint sprigs (for garnish)

Whisk egg yolks, Grand Marnier, 4 tablespoons water, and sugar in medium metal bowl. Set bowl over large saucepan of gently simmering water. Whisk until mixture becomes thick and foamy, for  3 minutes. Remove from heat; whisk 1 minute longer. Whisk in the sour cream and pour warm zabaglione over fruit. Garnish with mint sprigs. Serve immediately.

Wednesday, June 22, 2011

Pho Duy 6

I've been hearing about Pho (FAH) for a while now and I was curious. I've never eaten Vietnamese food before but I love trying new things so it was on my list of *things to eat before I die*.

In doing a little research....I discovered that many people that eat Pho, fall in love and want to marry Pho.

I was on a mission to find out if Pho and I were compatible. Would it be love at first sight?

I get together every six weeks or so with a group of local bloggers for some good food.  I thought this group would be the right people to have my Pho experience with and I was right.  A couple of us were Pho Virgins.

What Bloggers Do
Jolene, Rachel, Aimee
Not Pictured: Ratna and Denise

We met in Broomfield at Pho Duy 6.  It is located right next to the Pacific Ocean Market Place....I'm told it is the most complete Asian market in the north Denver area.  I can't tell you if that is the case for sure....because I was too busy having happy hour drinks at 3 Margaritas.

Back to the Pho.

I ordered the Beef Pho (the non tripe one) in a medium.  It was more than enough food and I should have ordered the small. A plate is brought to the table containing Thai Basil, Bean Sprouts and Lime. Throw it all in your bowl....along with some of the sauces, some sweet, some spicy.  Heaven!

Beef Pho

I adore Bubble Tea (they called it Boba) so I ordered that too. It was wonderful and I just love those little tapioca balls. There were many *ball* jokes thrown about. I do love balls.

Mango Boba

Because I'm a glutton for punishment and my eyes are much bigger than my stomach. I ordered Shrimp Spring Rolls. They were good...but not great. I still say that Talk of The Thai in Lakewood has the best ones...but they call them Summer Rolls.

Shrimp Spring Rolls

I enjoyed my meal at Pho Duy very much....even though our server insulted me for being old. This place doesn't have a liquor license and when one of my friends asked why...he said they don't like to embarrass people by asking for their identification. He gestured around the table, saying that he'd have to card all of us but then pointed towards me and said well....except for you. Awesome.

I really would have loved a beer with this meal so next I'll be trying out Pho Pasta in Denver. It's closer to my house anyway.

I found this funny video about Pho. I feel the exact same way!


Pho Duy 6 on Urbanspoon

Tuesday, June 14, 2011

Tuna Salad

This recipe is from the 20 Years Younger book and it's turned out to be my husband's favorite meal.  It's perfect for summer because it requires ZERO cooking. It's also worth noting that 50% of my children like it. And ask for more.


Tuna Salad
This is for ONE serving.  Increase amounts accordingly.

4oz tuna (i use water packed Albacore)
1 teaspoon capers (i chop mine)
1 medium tomato, diced
1 teaspoon dijon mustard
1/2 cup diced cucumber
1/2 cup diced celery
1 teaspoon olive oil
1 teaspoon fresh lemon juice
1 cup romaine or arugula

Mix all of the ingredients together and serve on a bed of  lettuce.  Serve with a whole wheat roll and fruit.

Thursday, June 2, 2011

Easy Kale Salad

I want to like Kale. It's only $1.29 a bunch and when cut up....makes a large amount of greens. Once you get past the fact that Kale kind of looks like a weed...you find that it's very nutritious and has anti-inflammatory powers. Kale is high in beta carotene, Vitamin K, Vitamin C and Calcium.

Kale can block the growth of cancer cells! My husband is always afraid that he's getting cancer so I plan to make him eat as much Kale as possible.

I found this recipe and thought it sounded really good and since it has apples in it...my kids might eat it. I was right! Everyone liked it. I loved it.  I recommend cutting this recipe in half if you are feeding a family of four.  Unless you want to eat Kale Salad for the next three days.

Kale Salad

Easy Kale Salad
adapted from Irreverent Vegan

1 bunch of kale, chopped
juice of one lemon
1 avocado, chopped
1 apple, chopped
1/4 cup walnuts, chopped or crushed
salt and pepper to taste

Put the chopped kale in a large bowl then add the lemon  juice.  Add salt and avocado pieces.  Massage mixture together.  The salt and oil in the avocado will soften the kale.  Throw in the apple, walnuts and salt and pepper and toss salad with tongs.  Chill in the fridge for a half hour before serving.

Monday, May 30, 2011

Salmon Burgers

My friend Adrienne from Knoxville Pixie posted a delicious looking picture on twitter yesterday.  It looked so good and perfect for summer BBQ season that I asked her to please guest post and share her recipe with us. I'm hoping to try this recipe VERY soon because my bother in law just got home from a fishing trip to Sitka Alaska this morning.


My Hubs is a total carnivore and not the biggest salmon fan. However, since turning 35 this year, he has become a little more concerned about the kind of food he is eating and how better he can control his salt, cholesterol and fat intake. So after we scarfed down a smorgasbord of nachos, boneless chicken wings, french fries, and beer at a Sports bar on Saturday yet still awoke Sunday to a mean burger craving, I decided it might be a good time to try out a salmon burger recipe I’d previously been too intimidated to attempt.

I think I was nervous to try out a salmon recipe before due to the (what appeared to be) challenging preparation of the fish. But, it was seriously easy, even for me who owns only a food processor attachment for my blender as opposed to the real thing. So let’s get started, shall we?

After some research, I learned you want to get wild caught sockeye salmon if possible. Apparently it’s the best kind and the healthiest and if you want to know the reasons why, you’d have to ask my Hubs, I was too busy playing Angry Birds to pay attention when he told me. I actually found some on sale at my regular grocery store.  I picked up about 1.75 lbs of skin-on salmon fillets prepackaged at the fish counter. 

For starters, you want to remove the skin (I found it pretty easy to remove most of it by pulling it off by hand, and used a sharp boning knife if it gave me trouble). Once all the skin has been removed, cut salmon into chunks, and place in food processor or lame tiny food processor attachment and pulse until the fish is the consistency of ground beef.

Then transfer the salmon pulp into a large mixing bowl and add 1 tbsp poppy seeds and 1 tbsp grill seasoning. Mix with hands and form into 4 patties. Drizzle patties lightly with olive oil and yell at your Husband to hurry up with the yard work and turn on the grill because in the 6-yrs you’ve owned the pimped out piece of propane machinery, you’ve yet to learn how to turn the darn thing on. Hand the platter of raw fish patties to afore mentioned sweaty other half and bark at him to be sure to use the PAM for grilling spray before putting the burgers on the grill and not to cook the patties any longer than 3 mins per side.

While the burgers cook, make the super simple sauce. Combine ½ cup mayo, ½ cup sour cream and scallions in a bowl and place in fridge until burgers come of the grill.

After precisely 6 mins (or longer if you like your salmon more well done), remove perfectly cooked burgers from the grill, place on yummy crusty hamburger buns and top with scallion sauce, lettuce, and tomato. Serve alongside grilled veg and potato salad or whatever floats your boat. Enjoy!

Salmon Burgers Recipe
adapted from Rachael Ray

Serves 2

Ingredients:
  • 2 skinless salmon fillets (6 ounces each), cut into large chunks
  • 1 tablespoon grill seasoning, such as McCormick brand Montreal Seasoning
  • 1 tablespoon poppy seeds
  • Extra virgin olive oil for drizzling
  • 1/2 cup mayo
  • 3 scallions, whites and greens, chopped
  • 1/2 cup sour cream
  • Lettuce, for topping
  • Sliced tomato, for topping
  • French Hamburger Buns, lightly toasted

Directions:
Pre-heat the grill, to medium-high. 

Place the salmon in a food processor and pulse to grind the meat. Transfer the fish to a mixing bowl and season with the grill seasoning and poppy seeds. Mix and form four patties. Drizzle the burgers with olive oil. 

Cook the burgers for 3 minutes on each side for a pink center, or 3 minutes on each side for fully cooked fish.

While the burgers cook, in a bowl, combine the mayo, sour cream and the scallions. Top the burgers with the lettuce, tomato, onion and sauce and serve on crusty, toasted buns.

Saturday, May 28, 2011

Salted Toffee Chocolate Bars

I'm headed to my hometown of Greeley today for a party with two of my oldest friends. They've stuck with me through thick and thin for almost 20 years! When I left this cow town for the big city 11 years ago...I had a bit of a reputation for being a Martha Stewart type.

I can't let them know that I've gotten lazy....or that my Martha Stewart Living Subscription has lapsed.

Luckily...I had this recipe sitting in my in box from several months ago and since iKeith won't let me make desserts anymore, I thought it was perfect!

I'll let you know how everyone liked them and post more pictures later.  So far....I've just licked the pizza cutter and it tastes amazing!


Salted Toffee Chocolate Bars
adapted from Martha Stewart

13 graham crackers
1 bag (8 ounces) toffee bits
1 1/2 cups coarsely chopped toasted natural almonds
1/2 cup sugar
1 cup (2 sticks) unsalted butter
3/4 cup (4 ounces) bittersweet chocolate, chopped, or chocolate chips
3/4 teaspoon coarse salt

Preheat oven to 350. Cover a rimmed baking sheet with foil. Place 13 graham crackers in a single layer on sheet, edges touching. Spread toffee bits and almonds over the graham crackers.

In a small saucepan, bring sugar and butter to a boil over medium-high. Reduce heat slightly and cook at a rapid simmer, swirling pan occasionally, until mixture is syrupy, 2 minutes. Pour over graham crackers.

Bake until the sugar topping is bubbling for 12 minutes. Remove from the oven and immediately sprinkle chocolate and salt over graham crackers. With a pizza cutter, cut into 2-inch squares. Pull the tin foil out of the pan and let cool completely on the counter or a wire rack. They say that you can store these in an airtight container for up to a week...but I don't think they'll last that long!